Showing posts with label Do It Yourself. Show all posts

Saturday, March 23, 2013

Pipes and Gutters


Both RL and I have a set of these WATERWAY PIPES.  RL told me she wanted to let the girls play with pipes in the bath.  So she purchased some suction cups (they have them at the Dollar Tree) and adhered them to her waterway pipes.....


Suction cups glued on to pipe

Let dry


Colorful and FUN!!


The girls LOVED it!!


Pretty awesome, huh??


Its all fun and games until the glue is an epic FAIL!!


Well, that stinks!!  Take note:  hot glue, super glue, epoxy glue.....NONE of those work.  RL told me about the mishap and we brainstormed together.  I was initially under the impression that she used PVC pipes for this and my first thought was - my little man would LOVE that.  So, I started searching for ways to attach suction cups to PVC pipes - gotta love google!  I stumbled upon this post on THE BROODING HEN.  Ah-ha!!  So, we followed her advice.....


I used PVC pipes and a piece of rain gutter - huge hit!


We also love using these BATH TABLETS for an added element of color.

The great thing about these pipes if that we can use them on the PAHM EASEL or on outdoor windows/doors.


- AK & RL

Sunday, February 3, 2013

Bird Watching

Last month we were airing out the house.  We had all the windows open, and a lot of them do not have screens.  My oldest came running up to me and said "Mommy, come look!!!!!  There is a bird in the playroom."... and that's where it began......

From that day forward, we became bird watchers.  I placed a stool at the window so the girls could see out.  Luckily, the birds have made two nests that are visible from the window.  So fun!  

My oldest is a TOTAL animal lover.  She was very concerned on how the birds were going to get food, things to make their nest, etc.  She suggested we put out some bread for them and asked what they eat.  I told her "To be honest, I have no idea.  I don't really know a lot about birds.  Let's do some research."  We purchased a few books about birds and went to the pet store to talk with one of the workers.  


Placing some bread on the window ledge.  


Here is my oldest at the Pet store.  We talked about wild birds VS pet birds.  


Purchasing her bird seed! 


This invitation was all set up by my oldest.  

We talked about what kind of feeder she wanted to have, what we could use to make one, what she wanted to put in them, and how we were going to hang them.  

She wanted something clear so she could see the birds.  We had a fun "date" together shopping to search for some possible feeders.  

A couple things she wanted to try were a document holder and some small baskets.  We also picked up suction cups and clear command strips.  

I know you can buy window feeders at various places... you can see some on Amazon here... 


However, this was much more about the process than just buying a bird feeder.  


Filling up her basket with sunflower seeds.  


"Look, that is the bird I saw at the window this morning!!!!  We should get this kind."

That was really the bird we saw that morning!  :-)  Very cool.  


The hanging methods were all suggested by my oldest.  The baskets she picked out fit our suction cups perfect!  You gotta love when that happens.  


Suction cup pressed through hole.  


Our basket hanging in the window.  This does have a bit of a tilt to it, but it worked none the less.  


This was a document holder she found at Office Depot for $7.00.  It worked great!!  


We hung it in the window with a clear command strip.  


Watching for birds.  


She also wanted to provide the birds with something to make their nest.  We brainstormed together on things we could use.  We came up with grass, pine straw, dryer lint, string, and hair.

YES- you may cut a little bit of your hair to give to the birds.  (LOL LOL)  


We have two windows in the playroom and she insisted that we put something up in the other window... "because the birds in the front of the house need food, too".  

We didn't have any other containers so I told her to search around the house for something else we could use.  She grabbed our peg board buckets.  We LOVE the way these turned out.  

You can purchase the buckets here...  


Again, we just hung them with clear command strips.  


Our "nest bag" hanging in the window with a suction cup.  She ended up taking this down.  She said it blocked her view.  

I know we had a few concerns about birds flying into the windows.  

We have quite a few bird nests outside our windows.  The window will reflect the trees and sky whether the window feeder is there or not.  Window feeders are actually recommend to help prevent birds flying into the window because they slow down and stop to get the food VS flying "straight through."  If we were to see a lot of dead birds we would take them down.  However, it has not been an issue at all.  


Some of the birds we've been seeing.  

RL  

Saturday, February 2, 2013

DIY Magnetic Match Blocks

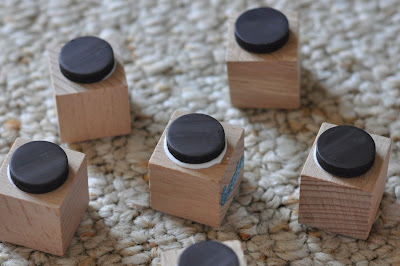
Since the SNAP BLOCKS are such a hit with my son, and he enjoys manipulating things with his hands, I wanted to combine the two and create a new, fun way to encourage letter recognition - something he is currently very interested.  If you read my SCOOTER BOARD LETTER FIND post, you know that he's pretty much mastered letter recognition within the last month.  He is interested in upper/lower case, but the possibilities are endless and by using stickers, you can change out your "theme".  

After searching all around town for the correct snaps, and coming up empty time after time, I was beginning to get discouraged.  RL suggested using magnets....uh, duh.....perfect!

THINGS YOU NEED:
wooden blocks
stickers 
glue

(AN ALTERNATIVE TO MAGNETS IS VELCRO.  WITH VELCRO YOU WONT HAVE TO WORRY ABOUT THE POLARITY OF THE MAGNETS)

You can get any size you want, but just make sure the stickers you choose fit on the blocks you choose.  You can see my choices in the pics below....


I chose these stickers because they have a sandpaper-like texture.  They are from Michaels.

These are the blocks I chose - from Michaels
The process is simple....just glue on the magnets FIRST,  find blocks (magnets) that are attracted to each other, then add the stickers.

Magnets - from Michaels

matching

matching

Add caption

My son really enjoyed this.  There are so many other fun ways to utilize these blocks.  

1. Match textures
2. Match colors
3. Match beginning sounds to pictures
4. Match amounts
5. Addition/Subtraction number sentences (would require magnets on both sides of the block)
6. spelling (I recommend using velcro instead of magnets if you plan to spell with the blocks)

Here is a beginning sounds example

Here is a counting example


ENJOY!

AK (MESE, MECD)


Thursday, January 17, 2013

Memory Books

Something I love about taking pictures.....lots and lots of pictures.....is being able to kind of "freeze" moments in time.  I thoroughly enjoy watching my son play and discover.  I find I have many, many "kairos moments" throughout my day and I often marvel at the simplest things when it comes to my child - 'look at the joy on his face', 'I love the way his little calf muscles are defined as he runs through the puddles', 'wow, I'm so amazed at his coordination and abilities', 'look at that adorable "wing" of hair that's flopping around as he runs', etc.  Is that weird?  I can even recall smells in certain moments that we spend together - like the salty, beach air.

We recently went on a mini vacation to the North Carolina coast - thanks to some dear friends.  Creating memory books is something I attempted with him when he was younger, but he showed no interest.  This time, he was so excited to make a book.  There are so many ways to create a memory book, but I wanted him to be a part of the entire process - picking the pictures, printing them, laminating, cutting, pasting, punching holes, sequencing, and most importantly - narrating.  (For the record, he declined on the cutting part.  I think it looked a bit overwhelming - all of that cutting that needed to be done.)

Here are the things you need (or things I used, anyway).....

pictures
construction paper
scissors
glue stick
laminate
laminator
comb binding machine
comb binders


My son chose the pictures he wanted to use for his book.  He printed them and then we sat down together and I asked him to tell me about each picture as I wrote what he was saying.  I typed/printed his words and cut everything out.  Then we worked together to paste all of the pictures onto orange construction paper - his choice.  Once the pictures were on, I read him his words and he matched them to the corresponding picture.  He laminated each page and then we sat and sequenced the events of our trip together (with very little help from me - I basically asked questions to assist him in the sequencing).  Once the pages were in order, he used the comb binding machine to punch the holes and then thread the pages.  

I didn't get to take a lot of pictures of the process, but if there was one picture I wish I had, it would be a picture of his face the first time we read the book together when it was complete.....priceless!!  He told me - "Mommy, I made that book, and it makes me happy.  It makes me want to laugh".


printed pictures

Proof reading is always a good idea - as I have misspelled a word on this page!  ARGH!!!

He titled the book "Jellyfish Adventures" and drew a jellyfish for the cover.  He only wanted the picture, no title.


His book now has a home on the book "shelf" in his bedroom.


- AK (MESE, MECD)


Thursday, November 15, 2012

DIY Activity Table

We converted our train table into a light table a while back.  Since then we have added many different elements to the table.  This is great for people who do not have a lot of space.  There are so many options with just one table.  The best part is... the table only cost $40.00 on Craiglist! You can customize it to your own children.  Here are some of the things we created...


LIGHT TABLE

For DIY instructions on how to convert a train table to light table click HERE.  


GEOBOARD

For DIY instructions on how to make a Geoboard click HERE


LIGHT BRITE

We cut 2 pieces of peg board the size of the train table boards.  We purchased Light Brite pegs on ebay.  I think they were around 5 or 6 dollars.  Just lay the panels on top of the light table and you have yourself a DIY Light Brite!  The pegs fit perfectly.  


WHITE BOARD/DRY ERASE

You can use the white plexi glass top to the light table to draw and paint on.  Here it is with the light on.


White board with the lights off.  


BLACKBOARD

We painted one side of our train table boards with blackboard paint.  Blackboard paint can be purchased at Home Depot.  We used two coats. 


WHITE WORK SURFACE

Lastly, we painted the other side of the train boards white.  We use this surface for everyday play... playmobil, building, legos, etc.  I also glued two pieces of Lego base plates to one end for lego play... which you can see below.  


LEGO TABLE

I used 2, 15 x 15 base plates... they also sell them in other sizes and colors.  


These are just a few options but the possibilities are endless.  

RL  


Tuesday, September 25, 2012

Play Tiles

We have a memory box from Discount School Supply (can been seen HERE) that you can open up and stick different objects inside.  My daughter loves it and is always looking for different things to add to the box.  She tried putting a couple pictures of her cousins inside but the pictures were too big.  It led to this...


DIY memory


We bought this package of wood slats at Michaels.  I think they were 3.99.  My husband cut them into 3 pieces.  I am sure they sell them in smaller pieces somewhere else but I didn't feel like making an extra trip.  These were 1/8th of an inch thick which I liked as well.  I put some Modge Podge on the piece of wood, placed the picture on, let it dry, and then took a razor blade around the edges.  After you cut them out put another layer of Modge Podge on top to seal them.  $5.00 and 15 minutes later we had our own custom memory set!  

\

While looking for the wood slates my brain was spinning with other things we could do with these.  We ended up making a bunch of different "Play Tiles".  The possibilities for these are endless!  You can see a few things we did with them below.  These would be great for travel, as a gift, and also wonderful on a magnet board or cookie sheet.  Just attach a magnetic strip or magnetic button to them.  

\

I purchased these letters also at Michaels (Buy 2 get 1 free this week).  I believe they were 1.99??  They come with both uppercase and lowercase letters.  They also had quite a few different colors but I wanted to stick with plain black.  


I attached them to these wood tiles.  These are different from the above picture.  I don't have a picture of the package because we already had these on hand at home.  You can find them with the wood crafting stuff at Michaels.  I am almost positive they carry them at Dollar Tree, too.  These are made by Creatology...  they are "Wood Squares".  I placed a letter sticker on each tile... uppercase and lowercase to make a memory game as well.  


You can also just use them for plain matching.  They would also work well for spelling for older children.  Again, they would be great on the magnet board.  


So many options!  Different shapes.  These are just stickers placed on each square.  


Colors.  I love the way these turned out.  I just Modge Podged different colored foam sheets to them (Dollar Tree).  You can use them for matching, patterns, memory, mosaics, etc.


RL