
Materials:
Cookie Cutters (We purchased a pack of 6 at Walmart for 88 cents)
Glue (We used white Elmers glue)
Food coloring
Squirt bottle (We used condiment bottles from Walmart.. 99 cents)
Wax Paper
Glitter (Optional)
Mix glue and food coloring in squirt bottles. Place your cookie cutters on a piece of wax paper and squeeze away!

My 22 Month old is not one for arts and crafts and she loved this one. Squeezing glue into cutters.

Shaking on some glitter

More glue.

She had a better angle from on top of the table. :-) As you can see here... my oldest was not yet ready to join this invitation.

More glitter sprinkling.

My oldest decided to join in. Some intense glitter shaking!
Finished.
These were maybe 1/8th of an inch thick?? They took a day and a half to dry completely. I just cut a small slit in them with a knife and hung them with fishing wire and sticky putty.


After some people having problems with leaks I decided to try a different way to give you another option....

Place your design underneath the wax paper.

Take a hot glue gun, outline the design, and fill up with your white glue! I used two layers of hot glue for the border. You could probably put some hot glue around your cookie cutter to keep the glue from leaking as well. We will have to try that one next time.

Finished.
2013

Invitation to make Easter Egg Glue Catchers
We've learned a lot since first starting with these. 2 layers of hot glue works perfectly. Also, instead of wax paper, use a piece of glass or pelxi glass. This way it peels off smoothly and you can pick it up and move it where ever you like while they are drying.

Filled eggs.

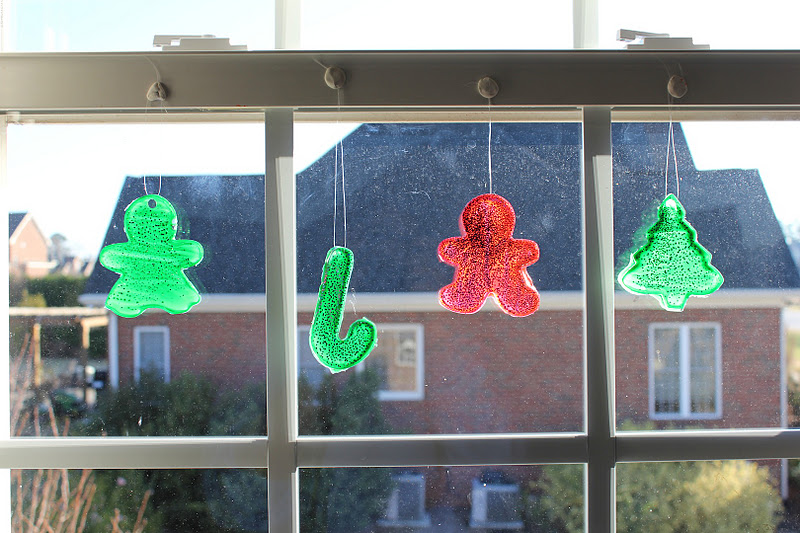
Up in the window.
RL
My boy got super excited when he saw me looking at the pictures. He started jumping up and down 'we do that?!?' can't wait to comply! Thanks for the idea. =0)
ReplyDeleteI love this one, sooooo simple!! Thanks
ReplyDeleteSuch a great idea. I'm new to your blog but plan to check back regularly.
ReplyDeleteWill need to try this! Since everything is non-toxic I think I'd feel comfortable using my regular cookie cutters (pretty easy to scratch chunks off, right?)
ReplyDeleteWith 2 school-aged kids, we get a lot of 1/2 used bottles of glue at the end of the year (why teachers let the kids open BOTH bottles you sent as school supplies before the first one is gone is beyond me)... thanks!
Very cute! I might have to try this with our play-doh cookie cutters.
ReplyDeleteBrittney
www.moms-heart.blogspot.com
These are beautiful! My class will love it!
ReplyDeleteWe will be doing this this week. We have too many cookie cutters!
ReplyDeleteHow fun! We might try this with our letter cookie cutters, too.
ReplyDeletewoohooo, you just gave me my next project with my students! Thanks!
ReplyDeleteWhat sort of glue did you use?
ReplyDeleteAwesome! Definitely doing this project with the 2 yr old. Do you just buy a big thing of elmers glue?
ReplyDeletethats a great idea! One thought might be to put the string in the cookie shape, and when it dries it already has a string? love it and am doing it! thanks for sharing!
ReplyDeleteThis is such a great idea! I can't wait to try it with my daughter. Thank you!
ReplyDeleteI love adding glitter to them! We made some of these a couple months ago and my kids ask to make them all the time! So fun!, http://4herreras.blogspot.com/2011/08/colored-glue-suncatchers.html
ReplyDeleteOk, this is just genius! The whole point of glue when you're two is to squeeze it all out of the bottle! Thanks for the idea!
ReplyDeleteWe used white Elmer's glue. I purchased the glue at discount school supply. They sell it by the gallon and it's the cheapest I've found. We used to do these when I was a kid but with yarn as the outline. We used to make circles and draw faces on them with permanent marker. You can get very creative with the yarn shapes. It would be great for older kids. I will make a yarn one next time we do these so you can get a visual. We also put a new spin on these today. Not sure how they are going to come out. They are still drying. They look beautiful. I hope they hold! Will keep you posted. :-).
ReplyDeleteDo you leave them in the cookie cutters the whole time they are drying? Do they pop out easily?
ReplyDelete@MommyCarrie. Yes, you leave the cookie cutters in the whole time they are drying. Yes, they pop out easily.
ReplyDeleteawesome idea!
ReplyDeleteFun! We've been making lots of ornaments this year. I love that you hang them in the window for a special effect.
ReplyDeleteVeronica- @ http://watchmeplaynlearn.blogspot.com/
I tried these yesterday, but the glue leaked all out of the cookie cutter. Is there a way to keep the glue from leaking out of the cookie cutter?
ReplyDelete@Brianna what kind of cookie cutter did you use? Was it plastic or metal? I noticed people that used metal ones had a harder time keeping the glue contained.
ReplyDeleteHere is a spin we did on them the other day... turned out great! http://playathomemom3.blogspot.com/2011/12/pony-bead-ornamentssuncatchers.html
ReplyDeleteThese are so pretty. I will definitely be making them in the future.
ReplyDeleteWe had the glue seep out from the bottom of the cookie cutters. Any tips?
ReplyDeleteWe also had glue seep out the bottom(using plastic cookie cutters). Maybe we'll put a book on top next time to hold them down? Ours probably weren't thick enough because they came apart when I was taking them out. We will probably try it with beads next! My daughter loved this activity, thanks for all the great ideas.
ReplyDeleteWe just made these. My girls couldn't fathom only make 2... so we went ahead and lifted off the cookie cutters a minute or two after putting the glue in. They expanded a little but so far 20 minutes later seem to be holding their shapes fairly well. The Christmas tree is more of a triangle and no longer has branches and the snowman is more of one giant blob than 3 circles... but they had a blast!
ReplyDeletei work at a day program for adults with developmental disabilities and ever since i started my job, i've been looking for sensory-stimulating projects for our clients. your blog is by far the best resource i've found. thank you so much for sharing such fun, interactive, educational and sensory activities... they truly are great for all ages. my question is- where did you get your light box? i've noticed that many of the projects you post utilize it, and i think it'd be a great addition to our sensory curriculum materials. thank you!!!
ReplyDeleteSorry for just getting back to Y'all now. I've experimented with this and if you had problems with them not working I think you may have used too much glue. We just did these again today. I did a few with just enough glue to cover the bottom and some with a lot of glue. The ones with more glue are seeping out. I hate when an activity doesn't work for someone! Maybe for those of you that are having trouble try using less glue. I will update after ours dry. RL
ReplyDeleteUseful information. Lucky me I discovered your website by accident, and I am stunned why this twist of fate didn't happened earlier! I bookmarked it.
ReplyDeleteArabic the Read and Write Way
Question: Where can I buy one of those light boxes? I have seen smaller ones at Michaels, but I want one like the one I always see on this site!
ReplyDeleteWe have been doing these since I first saw this pin. After reading comments regarding leaks, I decided to try something else to avoid leakage (although I am going to try your hot glue version too). I did them the exact way you did in tutorial but when my daughter and I were done, we placed a book on top in attempt to keep them in place. It worked great! LOVE these and LOVE your posts!
ReplyDeleteThe cookie cutter version of this did not work, even though I taped the sides to the pan, so there would be no leakeage. Don´t know why, maybe we added too much glue.
ReplyDeleteThe hot gun one workd out PERFECTLY! so we are doing them again as soon as we can, and we will try putting them on a laminated sheet. THanks for the idea!
Just tried this with my son and hes so destructive :/ we have a giant blob of glue with glitter all over.
ReplyDelete