Materials:
Cardboard box
Razor blade
Objects to put in holes
Some creativity!
THIS IS HOW I DID IT. There are so many options and possibilities to explore. For a sturdier piece you can use a piece of wood and drill holes, you can use paint, markers, letters, shapes, big holes, small holes, etc. etc. etc.
For the objects I used colored matchsticks, foam shapes, different color pony beads, colored pasta, and black rocks that I painted letters onto (Walmart $3.00). I set this up for both my 17M old AND my 2 year old. I wanted to make it fun and interesting for both of them. I made small holes both plain and some with color around them. Different shapes (triangle, square, circle, rectangle, and diamond). Letter holes and number holes. I did NOT force letters, numbers, shapes etc. on to them. They explored at their own free will. :-)
The invitation
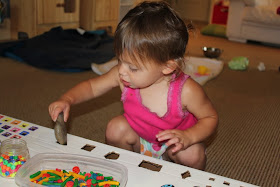
As I knew she would... she went right for the stones. She quickly learned that rock was too big for that hole.
Does it fit?
It was also fun banging the rocks together and making music. :-)
Where did it go?
She LOVED this!
My oldest woke up from her nap. She surprised me by going straight for the rocks as well. She chose to place them over the colored squares and count them.
Also interested in where everything was going.
I had not mentioned anything about the letters on the rocks. It wasn't until later that night when she
first discovered them. "Mommy, there is a C on this rock!"

Then she realized there were letters on the box, too. She is definitely more focused when she is by herself.
"This one is too big, maybe it will fit up here in the rectangle"
I plan on adding more of the black stone element. I wanted to paint the lowercase letters on the backside of the uppercase letters but didn't have time. I also bought a bag of gemstones and x-large rocks. They have a nice assortment at Walmart for only 3.00 for a decent size bag.
RL
 We've moved. Please click here to view our new blog.


Now this is pretty awesome!
ReplyDeleteThis is Great! Love it!
ReplyDeleteWOW Great!
ReplyDeletethis blog is very useful. u are very creative person carry on!!!
Cardboard Box
Can you tell us where you found those photo cubes in the background and what they are called? They are neat!
ReplyDeleteYou mean the emotion pics? Here - http://playathomemom3.blogspot.com/2011/07/teaching-emotional-intelligence-during.html
ReplyDeleteThe storage cube and pictures are separate items. The storage cubes can be found at Target... Itso Cube. Love them. They are extremely versatile. The Emotion Cards can be found here. http://www.constructiveplaythings.com/cgi-bin/s.sh/2.0/product.htm?pf_id=CD-45 You can also make your own as seen here. http://playathomemom3.blogspot.com/2011/07/i-take-lot-of-pictures-in-this-house.html RL
ReplyDeleteThis is amazing!!
ReplyDeleteI can't wait to make this! My twins will be all over it! Thanks!
ReplyDeletethis is so cool :) I'd love for you to come link it up at my linky party Fri-Sun every week! Bring all your creations!
ReplyDeletewww.smallfineprint.com
Love this idea...I just found the box I will use and I can't wait to try it out :)
ReplyDeleteAwesome! Now I need to find a box I can use it for. I think even my 4 yr old would love it!
ReplyDeleteThis is such a cool idea! With all the expensive educational toys out there, I'm always thrilled to see a good inexpensive one :)
ReplyDeleteAbsolutely FABULOUS!
ReplyDeleteThat is a FANTASTIC Idea! Im gonna go home and try it this weekend, as I have LOTS of big boxes from our move, and a BRAND NEW game room with hardwood floors for arts and crafts! YAY.. Also, noticed that your little girl has VERY curly hair, and anytime I see a little girl with curly hair, I pass along MY OWN gem of knowledge. Go RIGHT OUT to Barnes and Noble, or order online, "Curly Girl". It's a book ALL ABOUT curly hair and how to take care of it properly, and how to accentuate the curls (minus the frizz).. ALSO the affiliated website is www.naturallycurly.com. These resources changed my life with curly hair! Now that I have a daughter with curly hair, I know that she wont have to struggle with it the way that I did for 15 years (hating it the entire time.."the monster on my head"). Hope it helps! Happy Momming!
ReplyDeleteSo love this idea...wonder how long it held up?!
ReplyDeleteI love this idea and have been itching to do it for a while, so today I'm taking our big TV box and going to do this! I love your blog, thank you for all the cool ideas!
ReplyDeleteWhat an awesome activity! I want to make one of these for my toddler before his new sibling arrives (any week...better get going!) I shared a link to this post on my blog today. http://auroraspitfire.blogspot.com/2012/03/rainy-monday-silliness.html
ReplyDeletehttp://ilovetabbhighschool.blogspot.com/2009/10/djadsf-asd-as-asd-as-dfa-sdf-asf-asd-fs.html?showComment=1255087671492
ReplyDeleteBrilliant idea. This should be fun. Much better than those commercial ones.
ReplyDeleteI am so in love with this box. Go you! that was an awesome idea. Pinning this for later reference for sure!
ReplyDeleteAlex @ teachthroughplay.blogspot.com
Thanks for the post. I had been looking for something
ReplyDeleterelated and found your web site in the process.. I will definitely be back for more.
Double Edge razor